

Last Updated: October 26, 2026
Quick Summary
Troubleshoot car electrical problems by working in a fixed order: check the battery and terminals, test battery voltage with a multimeter, test the charging system with the engine running, then inspect fuses, relays, and the wiring for the affected circuit. A healthy battery reads near 12.6 volts engine off, and the charging system should show roughly 13.5 to 14.5 volts running.
- Disconnect the negative battery terminal before working on wiring, and wear safety glasses.
- A battery below about 12.4 volts at rest is partly discharged.
- Voltage well above 15 volts means overcharging, so stop driving and have it checked.
- A blown fuse is a symptom; a fuse that keeps failing points to a short circuit.
- A code identifies a circuit or condition, not a proven bad part.
Table of Contents
- Start With the Symptoms: What Your Car Is Telling You
- A Safe, Ordered Diagnostic Workflow for Car Electrical Problems
- How to Use a Multimeter on a Car
- Battery, Alternator, and Charging System: Reading the Numbers
- Troubleshooting Parasitic Battery Drain
- Fuses, Relays, Wiring, and Circuit Tracing
- Intermittent Faults and Modern Diagnostic Trouble Codes
- Book an Electrical Diagnostic at Performance Automotive and Tire Center
- Frequently Asked Questions
Start With the Symptoms: What Your Car Is Telling You
A car that cranks slowly, dims its lights, or clicks instead of starting is usually announcing a fault in the car electrical system before it fails completely.
Electrical problems rarely appear at random. They follow patterns tied to the battery, charging system, wiring, or a specific circuit, sorting those clues is the first step in troubleshooting car electrical system problems.
If you own an older vehicle, some of these faults are simply age catching up. Our guide to affordable car maintenance tips for older vehicles covers how to keep a high-mileage car reliable without overspending.
The Eight Symptoms That Point to an Electrical Fault
- Slow cranking or a clicking starter points to a weak battery or a bad connection.
- A dead battery that keeps returning after a jump means something is draining it.
- Flickering or dim lights suggest a charging or ground problem.
A Safe, Ordered Diagnostic Workflow for Car Electrical Problems
The fastest way to find an electrical fault is a fixed order: battery, charging system, fuses, wiring, then the specific circuit. Skipping ahead wastes time and can send you replacing good parts.
Here is the order we follow:
- Check the battery and terminals. Look for corrosion and tight clamps.
- Test battery voltage with a multimeter, engine off.
- Test the charging system with the engine running.
- Inspect fuses and relays for the affected circuit.
- Trace the wiring for that circuit only.
- Scan for trouble codes on modern vehicles.
- Verify the repair by retesting under load.
Safety Precautions and When to Stop
Electrical work carries real risk. A car battery holds enough current to cause serious burns, and a short can start a fire.
Follow these rules:
- Disconnect the negative battery terminal before working on wiring.
- Wear safety glasses and remove metal jewelry.
- Never test a circuit by holding a wire to ground.
Watch out: probing an airbag circuit can trigger the airbag or damage the module. Leave supplemental restraint wiring alone.
How to Use a Multimeter on a Car
A multimeter is the single most useful tool for electrical diagnosis, measuring voltage, resistance, and continuity, enough for most faults.
Set the meter to DC volts and follow these steps:
- Test the battery. Touch the red probe to the positive post and the black probe to the negative post, engine off. A healthy, fully charged battery reads near 12.6 volts.
- Test the charging system. Start the engine and retest. You should see roughly 13.5 to 14.5 volts at the battery.
- Run a voltage drop test. Measure from the battery positive post to the starter positive terminal while cranking. A large drop points to a bad cable or connection.
- Check continuity. With the circuit off, touch both probes to the ends of a wire. A reading near zero ohms means the wire is intact.
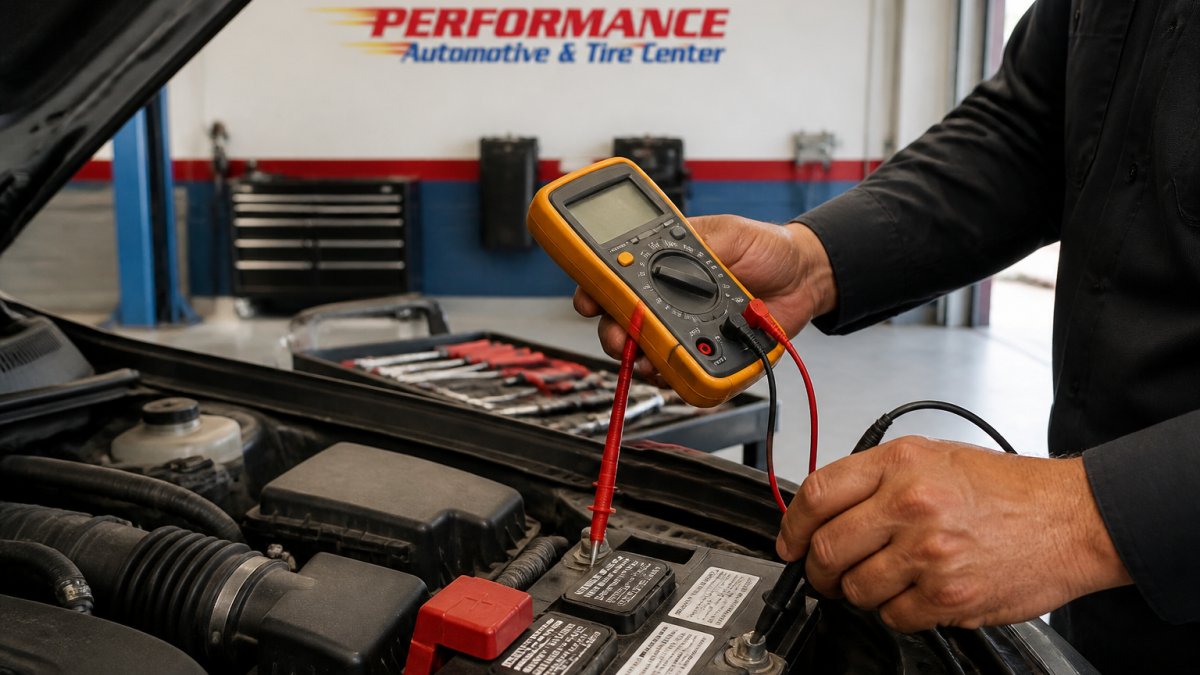
The multimeter basics guide from Fluke explains how to read each setting safely. A common mistake is testing resistance on a live circuit. Always switch the circuit off first.
Battery, Alternator, and Charging System: Reading the Numbers
The battery stores power and the alternator makes it. When one fails, the other often gets blamed. The numbers on your multimeter separate them.
A battery below about 12.4 volts at rest is partly discharged; one that drops sharply under a load test is failing even if it shows good voltage at rest.
The charging system should hold roughly 13.5 to 14.5 volts with the engine running. If it reads low, the alternator or its wiring is the likely cause.
Signs of a Bad Car Alternator
- Headlights brighten when you rev the engine, then dim at idle.
- The battery warning light stays on while driving.
- The battery keeps dying even after a full charge.
A failing alternator can also overcharge, which shortens battery life and can damage electronics. If you see voltage climbing well above 15 volts, stop driving and have it checked.
The multimeter numbers separate a weak battery from a failing alternator.
| Item | Reading | What it means |
|---|---|---|
| Healthy battery, engine off | Near 12.6 volts | Fully charged |
| Battery at rest | Below about 12.4 volts | Partly discharged |
| Charging system, engine running | Roughly 13.5 to 14.5 volts | Normal |
| Charging system | Well above 15 volts | Overcharging; stop driving and have it checked |
| Battery under load test | Drops sharply | Failing even if rest voltage looks good |
Troubleshooting Parasitic Battery Drain
A parasitic draw is current that keeps flowing after the car is off, draining the battery overnight, one of the most common and frustrating electrical faults.
To find it:
- Charge the battery fully and confirm it holds voltage.
- Turn everything off and close all doors.
- Connect an ammeter in series with the negative battery cable.
- Wait for modules to sleep, which can take several minutes on modern cars.
- Note the reading. A small draw is normal; a large, steady draw is the fault.
- Pull fuses one at a time until the draw drops, which identifies the circuit.
Watch out: pulling fuses on a live circuit can set trouble codes and upset modules. Reconnect the battery and clear codes afterward if needed.
Fuses, Relays, Wiring, and Circuit Tracing
A blown fuse is a symptom, not the disease. If a fuse keeps failing, a short circuit is feeding it, and replacing the fuse alone will not fix it. The real work is tracing the circuit from power source to load to ground, one test point at a time.
Call us at 480-924-7444 today! →
Start With the Fuse and Relay
- Pull the fuse for the dead circuit and hold it up to a light. A blown element has a visible gap or a blackened, melted strip.
- If the fuse looks good, confirm power at the fuse box with the key on: red probe on the fuse test tab, black probe on a clean chassis ground. No voltage means the fault is upstream of the fuse.
- Swap the relay with an identical one from a non-critical position (many fuse boxes have a spare or a matching horn or fog-light relay). If the circuit comes back, the relay was the fault.
Read the Wiring Diagram Before You Probe
A wiring diagram is a map, and every circuit has the same four parts: a power source, a protection device (fuse or fusible link), a load, and a ground return. Before touching the car, mark these on the diagram:
- The fuse or breaker that feeds the circuit.
- Every connector and splice between the fuse and the load.
- The ground point (G-number) where the circuit returns to the body or engine.
- The wire color codes and gauge, so you can identify the right wire in a harness bundle.
Most factory service information labels wires with a color abbreviation and circuit number (for example, PPL/WHT for purple with a white stripe). Match the diagram to the harness before probing, guessing at wire color is how good circuits get damaged.
Test Power and Ground at Each Point
Work from the fuse toward the load, then from the load back to ground. At each connector, back-probe the terminal (never pierce the insulation) with the circuit on:
- Power side: red probe on the circuit terminal, black probe on a known-good chassis ground. You should read battery voltage, roughly 12.6 volts on a charged battery. A reading that drops sharply as you move toward the load points to resistance in a connector, splice, or switch.
- Ground side: red probe on battery positive, black probe on the circuit ground terminal. You should again read near battery voltage. A low or zero reading means the ground path is open or corroded.
- Load test: if voltage is present at the load but the component does not run, the load itself or its ground is the fault.
Open Circuit vs. Short Circuit
An open circuit stops current entirely: a broken wire, disconnected connector, or failed switch. A short circuit sends current where it should not go, to ground (a dead short) or to another circuit (a cross-short).
- To find an open, set the meter to continuity or ohms with the circuit off and probe both ends of the suspected wire. A reading near zero ohms means the wire is intact; infinite or OL means it is open. Flex the harness while watching the meter, a reading that jumps confirms a broken wire inside intact insulation.
- To find a short to ground, disconnect both ends of the circuit, set the meter to ohms, and probe the suspect wire to chassis ground. A low reading means the wire is touching ground somewhere along its run. Isolate by disconnecting connectors at intervals until the reading goes high.
- A short that blows a fuse instantly is usually a pinched wire against metal; a short that blows the fuse only when a component runs is usually inside that component.
Never test a circuit by running a jumper wire from battery positive to ground or by holding a wire to ground. That creates a dead short, can weld the wire to the terminal, and can start a fire. Use a fused jumper or a test light instead.
Verify the Repair
After replacing a wire, connector, or component, retest under load, turn on the accessory, run the motor, or cycle the switch. Confirm voltage at the load, the ground, and that the fuse holds. A repair that passes a static test but fails under load is not finished.
Intermittent Faults and Modern Diagnostic Trouble Codes
An intermittent fault is the hardest kind to catch because it may not appear when you test. Reproduce the conditions that trigger it, heat, cold, vibration, moisture, or load, and use the vehicle’s diagnostic system to narrow the circuit before probing.
Reproduce the Condition on Purpose
Write down exactly when the fault appears: after rain, on rough roads, after warm-up, with the A/C on, or only at certain speeds. That pattern tells you which stress to apply.
- Heat: run the engine or the affected accessory until it reaches operating temperature, then test. A hair dryer on a module or connector can reveal a heat-sensitive solder joint, but keep it moving and do not melt plastic.
- Cold: park the car outside overnight in cold weather, or use freeze spray on a suspect component (available at parts stores) to chill it while watching the meter.
- Vibration: with the circuit live and the meter connected, gently flex the harness and tap connectors with a screwdriver handle. A reading that jumps or a component that cuts in and out confirms a loose connection or a broken wire inside its insulation.
A common pattern is a fault that only appears when the engine is hot and the harness is heat-soaked; the same test cold will pass. Test both states before you conclude the circuit is good.
What a Trouble Code Really Tells You
Modern vehicles log fault codes even when the problem is not active. A scanner points you to the right circuit, but a code identifies a circuit or condition, not a proven bad part. An oxygen sensor heater code, for example, can mean a bad sensor, broken wire, corroded connector, or failed fuse, the code cannot tell you which.
Use the code as a starting point:
- Read the code and note whether it is current, pending, or history.
- Look up the code’s set conditions in the service information, what voltage, time, or resistance the module expected to see.
- Test the circuit the code names, not the component the code’s name suggests.
- Clear the code only after the repair, then drive the vehicle through the conditions that set it originally.
A scanner that can read live data and freeze-frame data is far more useful than a basic code reader. Freeze-frame captures the conditions, engine temperature, speed, load, at the moment the code set, which is often the fastest route to reproducing an intermittent fault.
Module Communication Faults
On modern vehicles, modules talk over data buses (CAN, LIN, and others). A communication code (often a U-code) means one module could not hear another, caused by a bad module, shorted or open bus wire, poor ground, or low battery voltage. Check battery voltage and grounds first, then inspect bus wiring at each module connector.
Verify the Repair Under the Same Conditions
Once you find the fault, verify the repair the same way you found it: clear the codes, retest under load, and drive through the heat, vibration, or moisture that caused the problem. If the fault does not return after a full drive cycle, the repair is likely complete.
Book an Electrical Diagnostic at Performance Automotive and Tire Center
Electrical faults reward patience and punish guesswork. If your symptoms point beyond a simple battery, a proper diagnostic saves money over replacing parts one by one.
Performance Automotive and Tire Center is a family-owned shop with ASE-certified technicians who trace electrical faults with the right equipment. If you want to know whether an independent shop can handle your fault, read can independent mechanics fix electrical issues. You can also check how to verify a repair estimate before you approve any work, or see our dealer vs independent mechanic cost comparison if you are weighing your options.
If you need a shop with ASE-certified mechanics, our guide on finding an ASE certified mechanic explains what to look for.
Call 480-924-7444 to schedule your electrical diagnostic.
Frequently Asked Questions
What are the five steps in diagnosing an electrical problem?
A workable order is: verify the complaint and note when it happens, do a visual inspection of battery terminals, fuses, and ground straps, test the battery and charging system with a multimeter, isolate the affected circuit with a continuity and voltage drop test, then confirm the repair by re-testing under the same conditions that caused the fault. Skipping the battery test first is the most common reason people replace parts that were never broken.
How do you use a multimeter to check for a parasitic battery drain?
Set the meter to DC amps, disconnect the negative battery cable, and connect the meter in series between the cable and the battery post. Close all doors and let modules go to sleep, which can take 30 to 60 minutes on newer vehicles. A reading above roughly 50 milliamps points to a drain. Pull one fuse at a time and watch the reading drop to find the circuit responsible, then trace the components on that circuit.
What are the signs of a failing alternator versus a bad battery?
A weak battery usually shows slow cranking, dim lights at idle, and a no-start after the car sits. A failing alternator often shows a battery warning light while driving, lights that brighten with engine speed, a burning smell, or a whining bearing noise. Testing settles it: a healthy charging system holds about 13.5 to 14.5 volts at the battery with the engine running. Below that, the alternator or its wiring is the likely cause.
Is it safe to troubleshoot car electrical systems without professional training?
Basic checks are safe if you disconnect the battery before touching wiring, wear safety glasses, and never probe airbag circuits or high-voltage hybrid cables. Stop and call a shop if you smell burning, see melted insulation, find a short you cannot trace, or the fault involves the airbag, ABS, or high-voltage systems. Those circuits can cause injury or costly damage, and an ASE-certified technician has the wiring diagrams and scan tools to trace them correctly.
Electrical gremlins rarely fix themselves, and guessing at parts gets expensive fast. If your battery keeps dying, your lights flicker, or a fault comes and goes, let our ASE-certified team trace it properly. Performance Automotive and Tire Center offers free estimates, free loaner cars, and a nationwide warranty, so you get an honest answer and a repair that holds. Get started with Performance Automotive and Tire Center and put your electrical problems behind you.
Tags: car electrical, how to use a multimeter on a car, signs of a bad car alternator, troubleshooting car electrical system problems, troubleshooting parasitic battery drain

